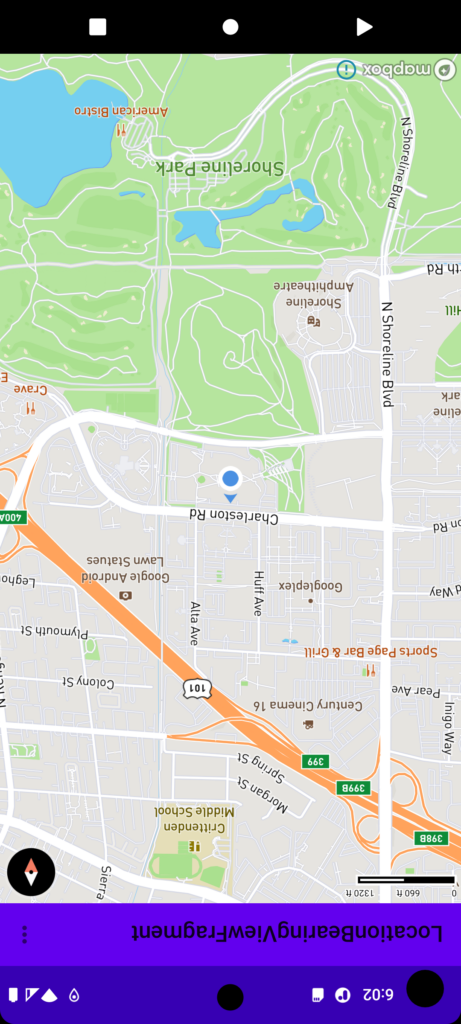
こんにちは。HAです。
今回はMapboxのMaps SDK for Androidを使用して、
地図を表示するAndroidアプリを作成するまでの流れをご紹介します。
開発環境
| PC | Windows 10 Pro 64bit |
| Android Studio | 2021.3.1 Patch 1 |
| Mapbox SDK | Mapbox Maps SDK v10 |
MapboxSDKの導入
1.アクセストークンの取得
Mapboxのアカウントを作成して以下のアクセストークンを取得します。
- パブリックトークン
- シークレットトークン
シークレットトークンを作成する際にDOWNLOAD:READにチェックを入れます。
2.シークレットトークンの設定
MapboxSDKをダウンロードするために必要なシークレットトークンの設定をします。
MAPBOX_SECRET_TOKENを取得したシークレットトークンに置き換えます。
MAPBOX_DOWNLOADS_TOKEN=MAPBOX_SECRET_TOKEN3.パブリックトークンの設定
パブリックトークンを定義します。
MAPBOX_PUBLIC_TOKENを取得したパブリックトークンに置き換えます。
<string name="mapbox_access_token">MAPBOX_PUBLIC_TOKEN</string>4.Mapbox Maps SDK Android のインストール
Mapbox Maps SDK Android のインストール設定をします。
dependencyResolutionManagement {
    repositoriesMode.set(RepositoriesMode.FAIL_ON_PROJECT_REPOS)
    repositories {
        google()
        mavenCentral()
        maven {
            url 'https://api.mapbox.com/downloads/v2/releases/maven'
            authentication {
                basic(BasicAuthentication)
            }
            credentials {
                // Do not change the username below.
                // This should always be `mapbox` (not your username).
                username = "mapbox"
                // Use the secret token you stored in gradle.properties as the password
                password = MAPBOX_DOWNLOADS_TOKEN
            }
        }
    }
}
Mapbox Maps SDK for Androidの依存性を追加します。
dependencies {
    implementation ('com.mapbox.maps:android:10.4.0'){
        exclude group: 'group_name', module: 'module_name'
    }
}
5.地図の表示
layoutファイルにMapViewを追加します。
<com.mapbox.maps.MapView
    android:id="@+id/mapView"
    android:layout_width="match_parent"
    android:layout_height="match_parent"/>
実装
現在位置の表示
位置情報の設定
location2Pluginで位置情報の設定をします。
enabledをtrueにして、現在位置のアイコンを表示にします。
locationPuckで現在位置のアイコンが設定出来ます。createDefault2DPuck()を使用すると下記画像のアイコンが適用されます。topImage、shadowImage、bearingImageの要素で構成されていて任意に変更可能です。
binding.mapView.location2
    .apply {
        updateSettings {
            this.enabled = true
            locationPuck = createDefault2DPuck(requireContext(), true)
        }
        addOnIndicatorPositionChangedListener(onIndicatorPositionChangedListener)
    }
現在位置更新イベント
現在位置の情報が取得出来ます。
現在位置が中心となるように画面が移動します。
private val onIndicatorPositionChangedListener = OnIndicatorPositionChangedListener { -> point
    binding.mapView.getMapboxMap().setCamera(CameraOptions.Builder().zoom(14.0).center(point).build())
    binding.mapView.gestures.focalPoint = binding.mapView.getMapboxMap().pixelForCoordinate(point)
}
デバイスの向きとマップの向きの同期
位置情報の設定
puckBearingSourceでbearingImageの向きが制御出来ます。
- HEADING:デバイスが向いている方向に合わせて向きを変える。
- COURSE:デバイスの進行方向に合わせて向きを変える。
binding.mapView.location2
    .apply {
        updateSettings {
            this.enabled = true
            locationPuck = createDefault2DPuck(requireContext(), true)
        }
        puckBearingSource = PuckBearingSource.HEADING
        addOnIndicatorPositionChangedListener(onIndicatorPositionChangedListener)
        addOnIndicatorBearingChangedListener(onIndicatorBearingChangedListener)
    }
位置情報のPluginについて
位置情報のPluginは location と location2 の2つ用意されています。
bearingの制御は locationだと精度が悪いためlocation2を使用しています。
ジェスチャー設定
ジェスチャー操作の設定をします。
rotateEnabledをfalse にして、ユーザー操作による画面の回転を無効にします。
binding.mapView.gestures
    .apply {
        rotateEnabled = false
    }
デバイスの向き更新イベント
デバイスの向きが取得出来ます。
画面の向きをデバイスの向きに合わせます。
private val onIndicatorBearingChangedListener = OnIndicatorBearingChangedListener { bearing ->
    binding.mapView.getMapboxMap().setCamera(CameraOptions.Builder().bearing(bearing).build())
}
マーカー表示
マーカー(Bitmap)の表示
val pointAnnotationManager = binding.mapView.annotations.createPointAnnotationManager()
val point = Point.fromLngLat(longitude, latitude)
val pointAnnotationOptions = PointAnnotationOptions()
    .withPoint(point)
    .withIconAnchor(IconAnchor.CENTER)
    .withTextAnchor(TextAnchor.TOP_LEFT)
    .withTextOffset(listOf(1.5, 0.0))
    .withIconImage(Bitmap)
    .withDraggable(true)
val pointAnnotation = pointAnnotationManager.create(pointAnnotationOptions)
ビューアノテーションの表示
val viewAnnotationManager = binding.mapView.viewAnnotationManager
viewAnnotationManager.addViewAnnotation(
    resId = R.layout.XXXXXXX,
    options = viewAnnotationOptions {
        geometry(pointAnnotation.point)
        associatedFeatureId(pointAnnotation.featureIdentifier)
        anchor(ViewAnnotationAnchor.BOTTOM)
        offsetY(pointAnnotation.iconImageBitmap?.height)
    }
)

ItemCalloutViewBinding.bind(view)
    .apply {
        XXXXXXX.text = ""
        XXXXXXX.text = ""
        ......
    }
オフライン
スタイルパックとタイル領域を事前にダウンロードしておくことで、
オフライン環境でも地図を使うことが出来ます。
オフラインマネージャーの準備
private val tileStore: TileStore by lazy {
    TileStore.create().also {
        it.setOption(
            TileStoreOptions.MAPBOX_ACCESS_TOKEN,
            TileDataDomain.MAPS,
            Value(requireContext().getString(R.string.mapbox_access_token))
        )
    }
}

private val resourceOptions: ResourceOptions by lazy {
    ResourceOptions.Builder().applyDefaultParams(requireContext())
        .tileStore(tileStore)
        .build()
}

private val offlineManager: OfflineManager by lazy {
    OfflineManager(resourceOptions)
}スタイルパックとタイル領域のダウンロード
// スタイルパックのダウンロード
val stylePackCancelable = offlineManager.loadStylePack(
    Style.MAPBOX_STREETS,
    StylePackLoadOptions.Builder()
        .glyphsRasterizationMode(GlyphsRasterizationMode.IDEOGRAPHS_RASTERIZED_LOCALLY)
        .metadata(Value(STYLE_PACK_METADATA_ID))
        .build(),
    { progress ->
        // Downloading style pack
    },
    { expected ->
        if (expected.isValue) {
            expected.value?.let {
                // Style pack download finished successfully
            }
        }
        expected.error?.let { StylePackDownloadError ->
            // Handle error occurred during the style pack download.
        }
    }
)

// スタイルパックとタイル領域のダウンロード
val tilesetDescriptor = offlineManager.createTilesetDescriptor(
    TilesetDescriptorOptions.Builder()
        .styleURI(Style.MAPBOX_STREETS)
        .minZoom(0)
        .maxZoom(16)
        .build()
)

val tilePackCancelable = tileStore.loadTileRegion(
    TILE_REGION_ID,
    TileRegionLoadOptions.Builder()
        .geometry(point)
        .descriptors(listOf(tilesetDescriptor))
        .metadata(Value(TILE_REGION_METADATA_ID))
        .acceptExpired(true)
        .networkRestriction(NetworkRestriction.NONE)
        .build(),
    { progress ->
        // Downloading tile region
    },
    { expected ->
        if (expected.isValue) {
            expected.value?.let {
                // Tile region download finishes successfully
            }
        }
        expected.error?.let { TileRegionDownloadError ->
            // Handle error occurred during the tile region download.
        }
    }
)利用可能なスタイルパックとタイル領域の取得
事前にダウンロードしたスタイルパックとタイル領域が取得できます。
// 利用可能なスタイルパックの取得
offlineManager.getAllStylePacks { expected ->
    if (expected.isValue) {
        expected.value?.let { stylePackList ->
            // Available style pack
        }
    }
    expected.error?.let { StylePackCheckError ->
        // Error
    }
}

// 利用可能なタイル領域の取得
tileStore.getTileRegion(TILE_REGION_ID) { expected ->
    if (expected.isValue) {
        expected.value?.let { tileRegionList ->
            // Available tile region
        }
    }
    expected.error?.let { TileRegionCheckError ->
        // Error
    }
}
まとめ
Mapbox SDKは事前にスタイルパックとタイル領域をダウンロードすることでオフライン環境で地図が使える点が特徴です。
オフラインで利用できるメリットとして以下が挙げられます。
- ネットワーク接続が不安定な場所や接続が無い場所でもマップを利用できます。
- データ通信量やバッテリー消費量を節約することができます。
- マップのレンダリング速度や応答性が向上します。
これらの特徴をぜひ地図アプリ作成の参考にしてみてください。
関連記事
-
第1回 Visual C++で作成したDLL内のクラスをC#で利用する方法
こんにちは、ILCです。 Visual C++ (以下 VC++)で作成されたDynamic...
公開日:2024.01.19 更新日:2024.01.19
tag : Windows
-
-
-
【新機能探訪】Android 13から導入された『アプリごとの言語設定』
こんにちは、KNSKです。よろしくお願いします。 今回は Android13の新機能である『...
公開日:2022.12.09 更新日:2022.12.09
tag : スマートデバイス
-
第1回 ラズパイを使用したBLE通信 ~ ディスプレイ、キーボード、マウスを接続しないで設定 前編 ~
こんにちは、GTです。よろしくお願いします。 最近業務でラズパイのBluetooth機能を使...
公開日:2021.12.24 更新日:2021.12.24
tag : Bluetooth Raspberry Pi
-
こんにちは。WwWです。 システム系の開発をしていると様々な問題が起こります。 そこで今回は...
公開日:2023.04.28 更新日:2023.04.28


